
Looking for another reading game?! Looking for another way to trick them into getting loads of input?! Here’s a fun game that requires lots of reading and rereading…and a little bit lot of luck! (Which is the secret element to making any game fun!)
Now I have to warn you…this game has a bit of prep work involved before you play. If you’re looking for a Zero Prep, High Engagement game, this one isn’t for you. (Check out POP UP or The Lucky Reading Game to fit that bill!) But if you’ve got a bit of time (or an awesome TA to help you out) give it a try. My Little Darlings had a lot of fun with this one (This game makes it feel like you’re high rolling at the Vegas Craps Tables. Actually, I wouldn’t know, because, even though I’ve lived in Nevada for 30 years, I’ve only been to Las Vegas once, and I was certainly not old enough to gamble. But this game is a lot of fun, trust me!)
This game was inspired by Toma Uno, a game I learned from Kristy Placido and Cynthia Hitz who presented at ACTFL (which I didn’t actually attend, but watched the FaceBook Live!) with a dash of the High Rolling Vegas Craps Tables thrown in.
To Prep:
You need 6, 12 or 18 questions and answers. You could come up with questions and answers about a novel you’re reading, a Movie Talk you’ve already done or even with Special Person Interview write ups. We played this in Spanish 4 with Gran Hotel Character Descriptions and names. To get the most bang for my buck, I want my answers to be more than just a word or a sentence. (So, for my Gran Hotel Character Descriptions, I wrote a short paragraph describing each character, of course, using language that will be comprehensible for my Spanish 4 Little Darlings.)
In a slideshow, that you project for your students to read, type out the questions, but rather than numbering them, letter them. Feel free to use this one, make a copy and type in your own questions! Your questions will look like this:

If you’re only playing with 6 questions, you’ll have letters A-F and if you play with 18 questions, you’ll letter them A-R. Then you’ll want to animate your questions so they appear one at a time.
Then you’ll type out the answers to the questions in a Word Document. Once you have one answers typed up with a bit of space between them, adjust your margins to 1.5 on the left and right, so that the answers will fit on the answer document. It will look like this:

Then make enough copies for 1/2 your class. In a class of 30 students, you’ll need 15 copies.
Using a paper cutter on your stack of copies, first trim off the wide margins, then slice apart the answers, being careful to keep the same ones together. (So, you slice off the top of the page, those are all the same answer, so they’ll all go together in 1 envelope. )

- If you’re playing with 6 Questions and Answers, print this answer document and number your envelopes 1-6, on the back side. (On the side with the flap). Tuck each stack of answers into a different envelope.
- If you’re playing with 12 Questions and Answers, print this answer document and number 6 envelopes 1-6 in RED and number 6 envelopes 1-6 in BLUE. Tuck each stack of answers into a different envelope.
- If you’re playing with 18 Questions and Answers, print this answer document and number 6 envelopes 1-6 in RED, number 6 envelopes 1-6 in BLUE and number 6 envelopes 1-6 in GREEN. Tuck each stack of answers into a different envelope.

*It doesn’t matter which number is on the outside of the envelope, just as long as all the same answers are together in the envelope. In other words, you don’t have to make sure that the 1st question you typed is in envelope 1*
Make enough copies of the answer document so that each pair will have one, so in a class of 30, you’ll need 15 answer documents. Hang the envelopes around the classroom. I put half on a bulletin board and magneted the other half to my whiteboard. Hang them so that the numbers are visible and students and take answers out of the envelopes without taking the envelope off the wall.
Whew! That was a lot of prep! I’m sorry…but now we’re ready to play, and it will be worth it!
To Play:
Students pair up (I love using Animal Partner Sheets, but whatever floats your boat!).
Each pair needs: 1 glue stick, one dice, and one answer document. (Here’s a tip, if you’re in Nevada, stop by your corner casino and ask for dice! They’ve never told me no! If you’re not in Nevada, Amazon has got some pretty, colorful die).
And since teaching a new game is just another way to give them more input,here are the instructions, comprehensified: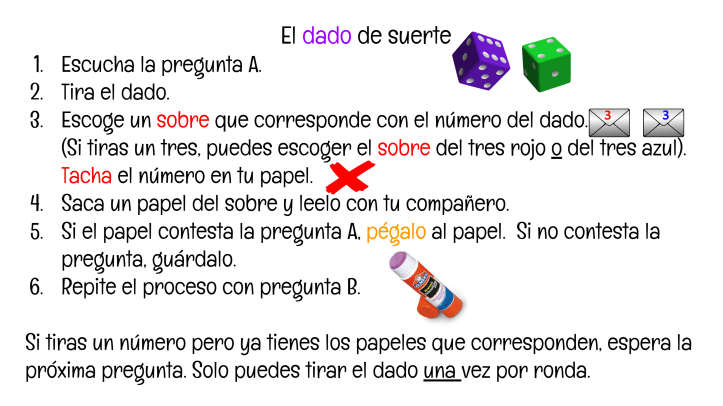
So basically, you project Question A and every pair of students roll their dice. They take an answer from the corresponding envelope, hoping that it will answer Question A. If it does, they glue it onto the Answer document, in the correct box. If it doesn’t, they hang on to it, wait for the next question, then roll the dice again.
If you’re only playing with 6 questions, they’ll take the answers out of the corresponding numbered envelope: you roll a 4, you take the answer out of the 4 envelope. If you’re playing with 12 or 18 answers, they get to choose which color of the number they rolled. So, let’s say they rolled a 6, they can pick a red 6 or blue 6 (or green 6!) Students will cross off the number at the top of their answer document that they selected, so they can keep track of which answers they have and which ones they still need.
Each time the teacher shows a new question, students roll the dice and get another paper. If the paper they selected (or any papers that they’ve previously selected that they’re waiting to use) matches a question, they glue it onto their Answer Document in the corresponding box.

However, students only get 1 roll per question…so if you’re playing with 12 questions, and they rolled a 5 and took the Red 5 answer the first round, and then another round they roll a 5 again, they would take the Blue 5. If they roll a 5 again, they must wait until another question is announced. They can’t roll again, hoping for another number. Remind your kiddos to cross off the numbers at the top of their Answer Document!
There’s one exception to the “Only 1 roll per question” rule. After the last question is announced, they can roll multiple times. So let’s say they just have one blank space, and they must roll a 2. After all the questions have been announced, they can roll until they get their missing 2 answer.
The first 3 papers in the teacher’s hands are the winners! At the end of the game, students are madly rolling their dice and gluing answers onto their Answer Docs. Be ready…students will dash up to you with their completed Answer Docs. When you get a paper, quickly verify that the answers are in the correct place (by looking at the projected questions) and announce your winners!
In my classes, winners earn Stamps on their Stamp Sheet.
It sounds complicated, but really it’s not! I filmed my class playing it, but my Little Darlings were just moving around so much, it was impossible to blur out everyone’s faces! I’m teaching this one tomorrow at our school’s PD day. I hope the grownups have as much fun as my Spanish 4s!

ok…my plan is to play this with our “what did you do over the weekend” information…am excited to use!
LikeLike
Ohhhh!!! Great idea!!
LikeLike