
It’s that time of year when everything is nutty and there’s just not enough time to do all the things and the end of the year is fast approaching and the Little Darlings have turned into wild animals because the sun is shining and they’d rather be anywhere else. Oh yeah, and let’s just add in “Teaching during a pandemic” to keep things interesting. Yeah, that’s where we are folks.
Looking for something EASY? Need to get a Speaking Assessment into the gradebook for a final exam? Want to keep it LOW STRESS for you and them?! Gone are the days of one-on-one interviews where kids would get so stressed out you could actually see the beads of sweat rolling down their brow and read splotches spreading across their necks. No more hours of assessing endless Flipgrid videos while you just want to scratch your ears off just to end the misery. (And I know…CI teachers are about giving them loads on input, and a speaking assessment is nothing but output…but at the end of the end of the year I’ve got to assess all their skills and this is a pretty painless way to do it!
I wrote briefly about how I assess speaking for my Spanish 1 Final in this post, inspired by colleague Karl. Over the past few years I’ve streamlined my process and I thought it deserved it’s very own post.
Now to the Important Stuff
With chairs, make a large outer circle and a smaller inner circle, facing each other. In my bigger classes, we are doing this outside this year, to ensure that everyone has plenty of space. Each student is facing another student and everyone has a role.
The kiddos in the outside circle respond to a question, talk about a topic or retell a story. Their goal is to talk as much as they can and they are the kiddos that the teacher is assessing. The inside circle students are their coach. Their job is to help their partner keep talking. They can ask questions (in English or Spanish) to help their partner think of more things to say and they help out if they see their partner is struggling to remember a word. And of course, the Inside Circle encourages with exclamations like “¡Yo también! ¿En serio? ¡Qué horror!”
Often the teacher will instruct one circle to rotate (so everyone gets a new partner) or instruct students to trade circles, so the inside circle students are now in the outside circle ready to be assessed, and the outside circle students move into the inside circle, ready to help their partner keep talking. This way they’re frequently talking to a new partner, and their taking turns being assessed.
While the students are chatting with their partner, the teacher is in the middle of the inside circle with a clip board, eavesdropping and taking notes. The proficiency checklist (linked below) makes it super easy to listen to a student for a few minutes, and then indicate which best describes their proficiency level.
I have found that it is easier to assess the outside circle students (even when masked, though the masks make it more difficult to hear.) since they are facing me while I’m in the center of the circle. Play around and see what works best for you.
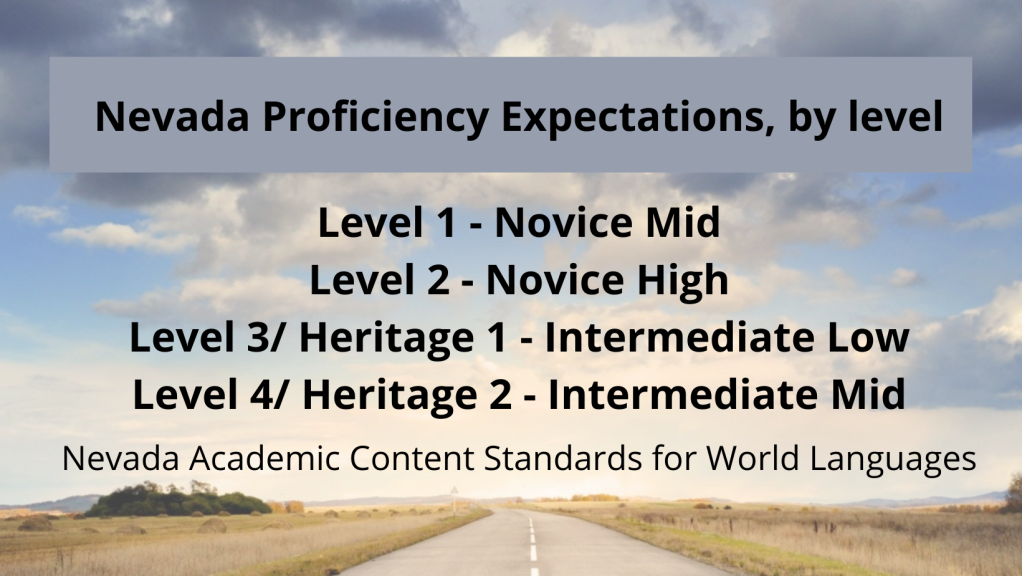
My state, Nevada, has proficiency targets for each level. To translate that into a grade, students who meet the proficiency target earn a B, students who are approaching earn a C and those who have exceeded it earn an A. So let’s say a Spanish 1 Little Darling is rocking and rolling with full sentences and even strings of sentences, welp, that earns an A, because it exceed the “Novice Mid” proficiency target for Level 1. The cool thing, is that everyone who participates earns a C, B or A. No one who’s speaking in Spanish is going to fail. I like to tell my Little Darlings this up front…if you’re speaking in Spanish, the lowest you can get is a C. They’re LOW STRESS Assessments, after all!
If you’re interested in learning more about my department’s take on Proficiency Based Grading, here’s what we do and how we explain it to our students and their parents.
Want to see it in action? This video is from a Pre-Pandemic world. You can see how we’re all packed into my tiny classroom, breathing all over each other, and smearing germs around with each “Chócola”. Ahhhh…the good old days!
A word about grading…
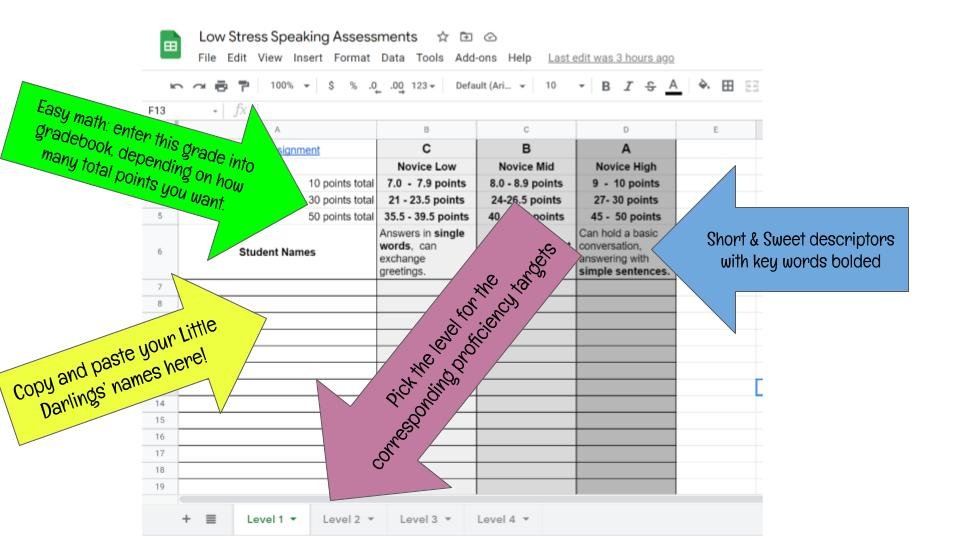
After you open the assessment (the link is below, keep reading!) Open the level you’ll use (pink arrow above), copy and paste your students’ names into the left column (yellow arrow) and decide how many points this speaking assessment will be worth (green arrow). The key words are bolded in the proficiency descriptions (blue arrow) to make it easy to compare the students’ speech to the level.
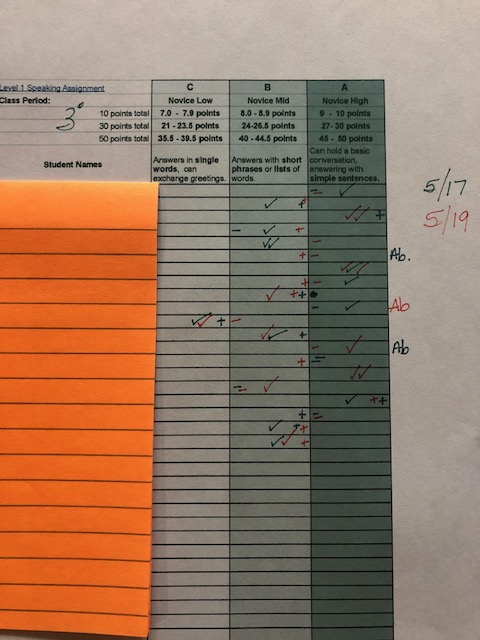
Each time you listen to a student, decide which Proficiency Level best describes their speech sample. For a solid A or B or C, I put a check mark in the center of the box, aligned with their name. To indicate a high A or B or C, I write a plus to the right side of the box and to indicate a low A or B or C, they get a minus on the left side of the box.
After I have multiple data points (meaning I have assessed them multiple times), I enter their average score into the gradebook. You can be scientific about this and actually breakout your calculator, but I just eyeball it. The scores right above the proficiency descriptors show you the point values for a 10 point assessment, a 30 point assessment and a 50 point assessment. The highest point value in the column represents an A+ or B+ or C+, the lowest point value represents an A-, B- or C-. I like that I can just look at the paper without having to do some maths, because simple math is not simple for me! Anyone with me?!
A few tips:
- I like to do this assessment over several class periods, so that I can have plenty of data points to make the final decision of the grade in the gradebook. I use a different colored pen each day, so it is easy to see who I need to catch during each session. For each session I shoot to get 2-3 marks per student, but in big classes 1-2 marks per student still works.
- While students are rotating, I take a few seconds to see which students I still need to listen to (or listen to again) and scout them out, so I can head over to listen to them right away.
- For lower levels, the proficiency descriptors are mainly on length of speech. Novice Low = single words, Novice Mid = phrases and lists of words, Novice High = short sentences. You don’t need to listen to the entire conversation to be able to mark what length of speech they’re producing. According to ACTFL, our novices don’t need to worry about tense. Halleluiah!
- In upper levels, tense accuracy becomes important. Intermediate Low = mostly present tense, Intermediate Mid = sometimes accurate tense, Intermediate High = mostly accurate tense. For these kiddos, I have to listen for a bit longer, and give them opportunities to use different tenses. For my Spanish 4’s Final (we’ve been living for the drama of Gran Hotel all year) they answered different questions about GH, which elicited specific tenses. “Who is the best/worst character in GH? / Which was the funniest/most dramatic/ most sad scene in GH and what happened? / Make a prediction: Will Alicia and Don Diego get married? What is going to happen?” I listen to everyone long enough to hear several verbs before marking on the checklist.
- If you really want to make this low stress…set it up like a “practice for the final”. After they’re finished, tell them they did so awesome that you’re actually going to use their scores for the final…and if anyone is unhappy with their score, they can always come in for a re-test.
Low Stress Speaking Checklist- Here it is!
Want to try it out with your Level 1 Little Darlings?! Here’s the Level 1 Checklist for free! (It will prompt you to “make a copy” then you can copy and paste your kiddos’ names right onto the check list.) Want to buy the whole kit and caboodle? Here are the Level 1-4 Speaking Checklists at my Teacher’s Pay Teachers store. But wait, there’s more! If you’ve already purchased my Writing and Speaking Rubrics, I added these checklists right into that document, so just go ahead and redownload it from “My purchases” and you’ll have access to it! (Look for the yellow highlighted portion on the first page.)
Almost to Summer, friends!
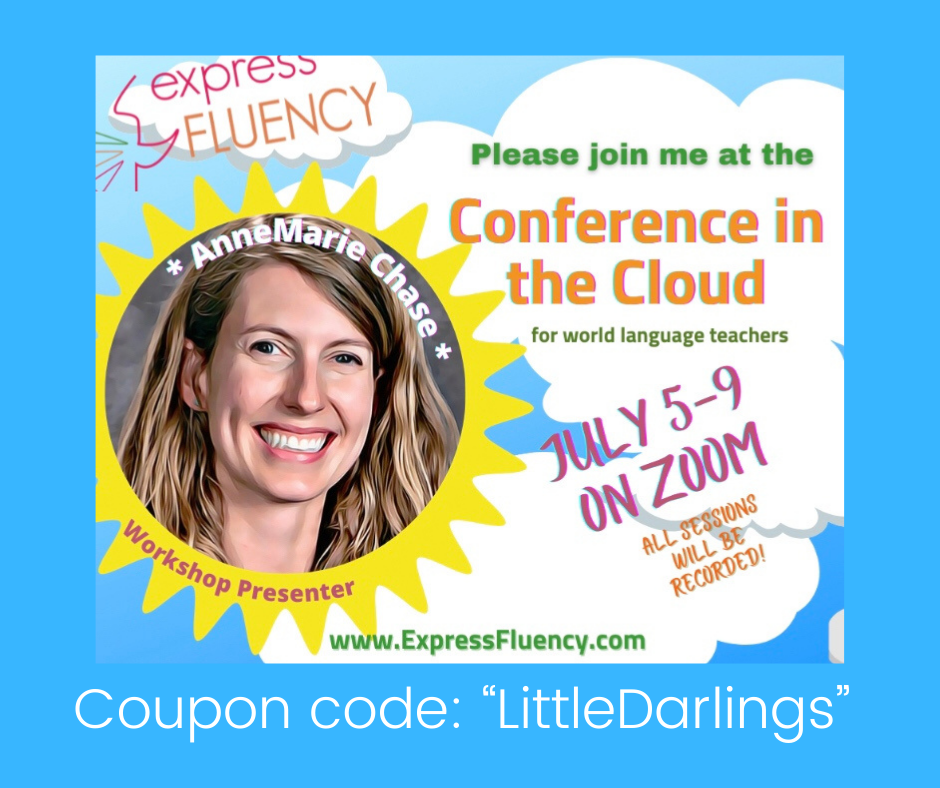
I hope that you’re real close to your well deserved summer break and that you have lots you’re looking forward to! I’m super excited about presenting at the Conference in the Cloud in July and I’d love for you to join me! If you’re interested in some top-notch Professional Development by some pretty fantastic teachers, you’ve got to check this conference out. Annnnd, if you use the coupon code “LittleDarlings” you’ll get $20 off your registration. The cost increases on June 1st, so if you’re considering attending, don’t delay!

¡Hola hola! This is such a great way of approaching speaking assessments and your video is such a joy to watch! I just purchased the writing & speaking rubrics on TeachersPayTeachers but I can’t seem to find the checklist that is what you show here in the document that I download. There are only rubrics. Thanks in advance!
LikeLike
OH my goodness – lo siento – I found the link! Thank you for these resources and for all of your lovely blog posts! I hope you have a good end to your year.
LikeLike
Thank you so much!! Very much appreciated and this is very helpful!
Carla
LikeLike
So I’m still getting into the CI groove. I used to have the students prepare an oral final. SO stressful! For them and for me. I was going to skip it this year totally, then I saw your post. I had them all do it spur of the moment this week. It was AWESOME! So much energy and genuine communication! I was overwhelmed with pride! Will do again for sure! Thank you thank you!
LikeLiked by 1 person
Yay!!! So happy to hear, and a breeze to grade, right?!?
LikeLike
[…] for ideas, I reached Sra. Chase’s blog and found her assessment ideas. I love her low-stress speaking assessments, and I started implementing these and her Magic cards for oral participation. These have […]
LikeLike
About how many weeks into the new school year will you do your first speaking assessment like this? I’m anxious to implement this assessment strategy this year! Thank you!
LikeLike
It would depend on the level. I don’t do this in my first years until the very end of the year as their final. Remember a flood of input is needed for a trickle of output! For Sp 2, I think waiting for Dec would give them enough time to get settled. Upper levels, go for it as soon as you want! Might be a good idea to try it without putting it in the gradebook, just to see where they are at the beginning of the year.
LikeLike